
How do I create/insert a slideshow?
A slideshow is a very engaging and dynamic way to display images while linking them to specific pages on your Hunter WebCMS subsite. A slideshow is a portlet item (more about portlets here) and, as such, can be inserted on a page/folder as a slide portlet, a pre-content portlet, a post-content portlet, or a pre-footer portlet.
Something that one could find counterintuitive is that images that are used for the slideshow are actually not taken from any repository. Indeed, images are inserted when a slide is created; more on this later.
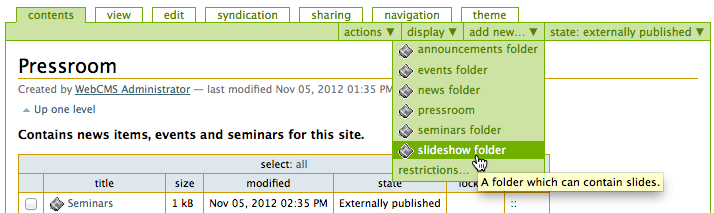
1. From the Contents tab, click on the Pressroom.

2. Once in the Pressroom, click on add new > slideshow folder:
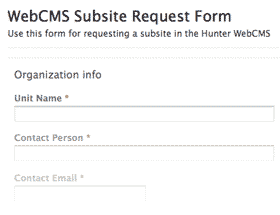
3. Enter a Title (required—in our example Test Slideshow) and an optional Description (in our example, This is a test slideshow...) for your slideshow, and click on save.

An empty slideshow folder will be created.

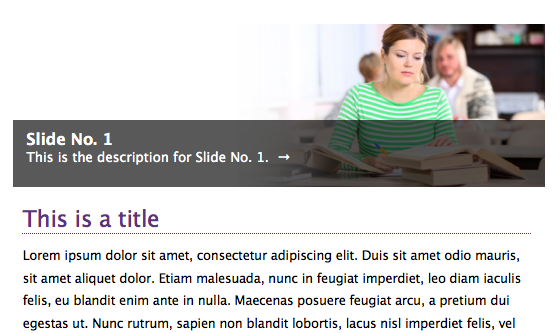
4. Now that the slideshow folder is created, it needs to be populated with slides. A slide is an image, hyperlinking or not to a page, that will be displayed in the slideshow for a duration that one can set. A title and a description can also be displayed on a semi-opaque layer at the bottom of the image.
From the slideshow folder you just created, click on add new > slide.

A blank new slide will be created.
5. Type a title for the slide (required—in our example Slide No. 1), an optional description that will be combined with the title and used as the slide caption, select an external or internal target (will the image link to another website or a page on your subsite?), choose if you want this link to open in a new window (not recommended), and upload a slide image. Click on save to save your slide.

Iterate steps 4. and 5. as many times as slides are needed.
6. Once all the slides are created, both the slideshow folder and all the slides will have to be published externally in order to appear on the live subsite. A quick way to do this is to go to the pressroom, check the box opposite the slideshow folder you just created (it should be in Working Draft state) and click on change state.
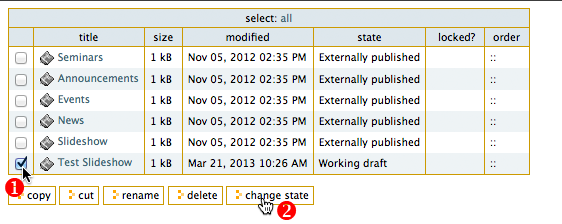
On the next screen, make sure to select Include contained items, and Publish Externally at the bottom of the window. Hit save.

Now all your slides and the containing slideshow folder are externally published. The slideshow is ready to be inserted on your website.
7. Decide where you would like to add the portlet: on a single page (recommended), a folder, or the whole website; and navigate to this destination within the CMS. Once there, click on the Portlet Management link, located above and below the content, as well as at the bottom of each side portlets areas.
Slideshows are usually pre-content portlets but you could insert them in a side portlet, a post-content portlet, or a pre-footer portlet (more info on portlets). In our example, we will insert a slideshow in a pre-content portlet. From the dropdown menu (Add portlet), select slideshow.

8. The next screen, is the portlet configuration:
- Portlet title: enter a portlet title; it will not be dislayed on your page, only in your portlet management area
- Slideshow Folder Location: click on add... and locate the slideshow folder in the Pressroom. Click on the Insert link across from your slideshow folder to select it.

- Image Scaling: Hunter WebCMS lets you choose between scaling the images or displaying them as their native side. One usually has more control over the layout of the portlet if one designs images of identical sizes and selects Clip to layout width.
- Transition: Hunter WebCMS offers 5 different kinds of transitions from slide to slide. Note that the same transition will be applied to all the slides contained in the slideshow folder. These transitions are: fade, scroll from bottom to top, scroll from top to bottom, scroll from right to left, and scroll from left to right.
- Transition time: the time between two slides. Transitions faster than a quarter of a second might attract too much attention to the slideshow (especially with a scroll transition).
- Slide duration: he duration of slides will depend on the content and on if one decides or not to display a title and a caption; a slide with a caption will require more time for people to read the text.
- Pause on Hover: a popular option is to pause the slideshow when the cursor is above a slide.
- Navigation: choose to display navigation buttons and/or bullets to manually transition between slides.
- Randomize Slide Order: check to shuffle the slide ordering (leave unchecked to display in folder order).
- Caption: choose the size of the slide captions or hide them completely.
- Slideshow Background: choose the style of the background for the slideshow. The default—use theme background color—is the recommended setting.
Click save. Your slideshow is now live on your website.