

How do I add and edit tables?
The process of adding and editing tables varies depending on which text editor you're using.
How to Add and Edit Tables Using the TinyMCE Text Editor
TinyMCE has some great built-in tools that allow you to easily add, manipulate and work with tables.
Note: While TinyMCE gives you many options for working with tables, it does not give you the ability to change cell padding, cell spacing, or table borders. These attributes are determined by your subsite's theme and by the formatting style you choose.
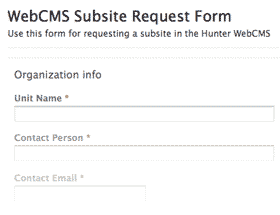
- Start by navigating to the page you'd like to edit and accessing the Edit Page screen. (Need help with this step?)
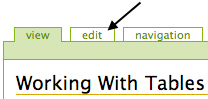
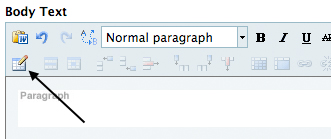
- Click inside the Body Text area where you want your new table to go.
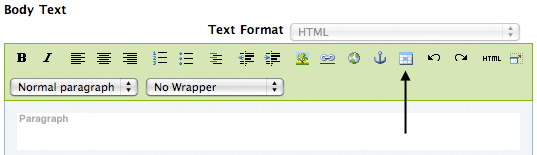
- Click on the Insert Table icon.
- A box titled Insert/Modify Table will appear. Choose a class (formatting style), and enter the number of rows and columns you'd like. The summary field is optional.
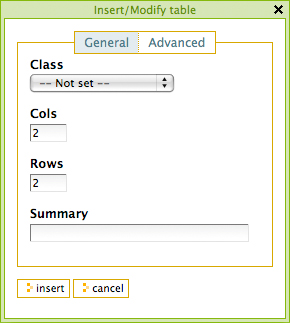
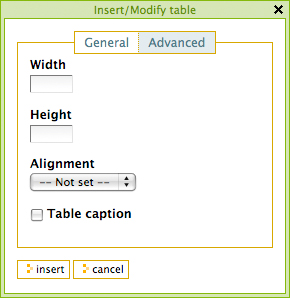
For additional options, click on the Advanced button. Here, you can enter the table's width and height in pixels, choose a table alignment, and enable/disable a caption for the table.
When you're done configuring your table, click on Insert. - You'll be returned to your Body Text area, where you can now enter text into your table.
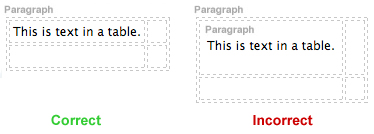
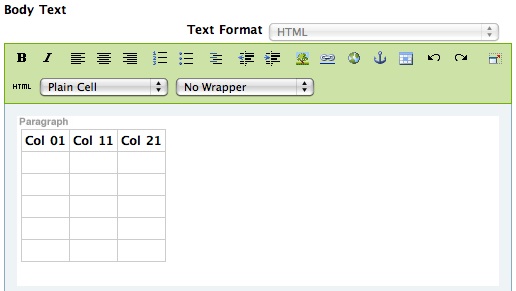
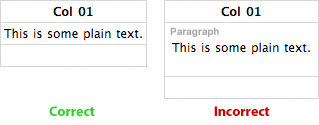
Note: When working with text in your table, we recommend not formatting it as a Paragraph using the formatting style drop-down menu in the toolbar. This will ensure consistent formatting between your table contents and the rest of your page.
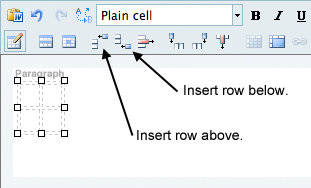
- To add a new row, click inside of a row directly above or below where you'd like to insert the new row. Then, use the Insert Row icons in the formatting toolbar to insert a row above or below the current one.
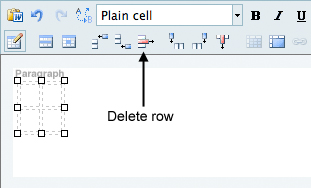
- To delete a row, click on any cell in the row you wish to delete, then click on the Delete Row icon in the formatting toolbar.
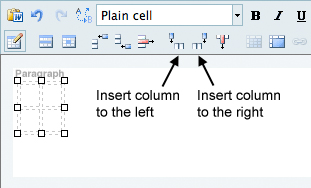
- To add a new column, click inside of a column directly to the left or to the right of where you'd like to insert the new column. Then, use the Insert Column icons in the formatting toolbar to insert a column to the left or to the right of the current one.
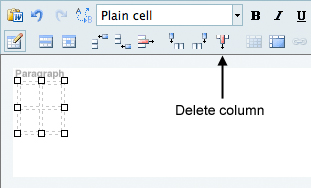
- To delete a column, click on any cell in the column you wish to delete, then click on the Delete Column icon in the formatting toolbar.
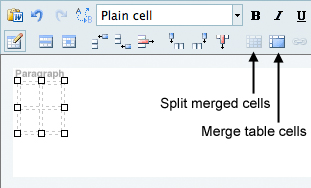
- To merge table cells, highlight the group of cells you wish to merge and click on the Merge Table Cells icon. To split merged cells, click on the Split Merged Table Cells icon.
- To resize a table, we recommend using the width and height options, rather than dragging and dropping the table borders. You can access the width and height options by clicking anywhere in the table, then clicking on the Insert Table icon. (See Step 3 above.)
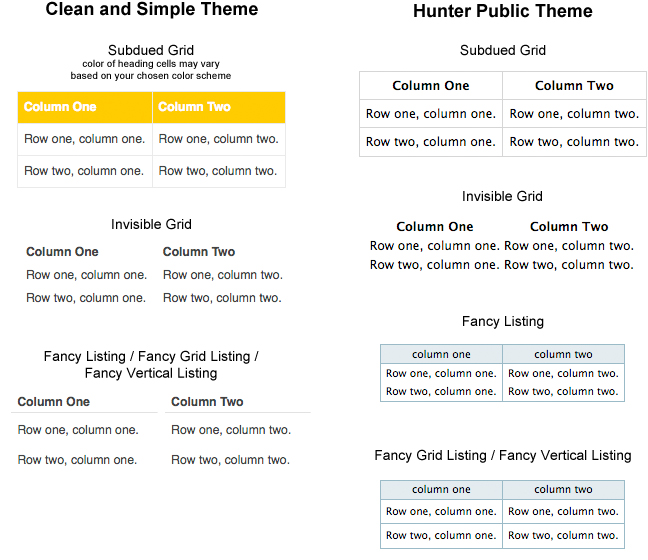
- To change the formatting style of your table, click anywhere in the table, then click on the Insert Table icon. (See Step 3 above.) This will open the Insert/Modify Table window, where you can change your table's class. Click here to view your formatting options.
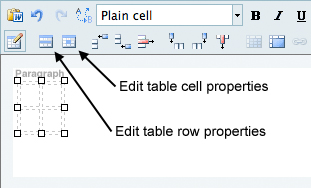
- The TinyMCE formatting toolbar offers two additional options: click on the Table Row Properties icon to configure your current row's height and vertical alignment, or click on the Table Cell Properties icon to configure your current cell's width, height and vertical alignment.
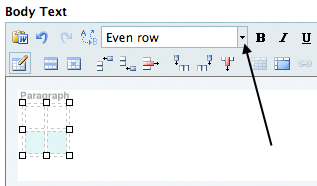
- To create contrast among your rows, you can mark rows as odd or even using the Style... drop-down menu in the formatting toolbar. Select either Odd Row or Even Row to mark your current row accordingly. Even rows will be indicated by a light-colored background. (The exact appearance may vary depending on your theme.)
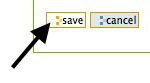
- When you're done working with your table, you can continue to edit the rest of your page. When you're finished, remember to click Save.
How to Add and Edit Tables Using the Kupu Text Editor
Kupu has a built-in table function that allows you to easily add tables to your pages, but its features are not as extensive as those in the TinyMCE text editor. If you regularly need to work with tables, we highly recommend switching to TinyMCE.
Note: While both text editors give you general options, neither gives you the ability to change cell padding, cell spacing, or table borders. These attributes are determined by your subsite's theme and by the formatting style you choose.
Instructions for working with Kupu's table options are below:
- Start by navigating to the page you'd like to edit and accessing the Edit Page screen. (Need help with this step?)
- Click inside the Body Text area where you want your new table to go.
- Click on the Insert Table icon.
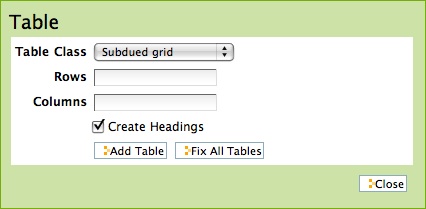
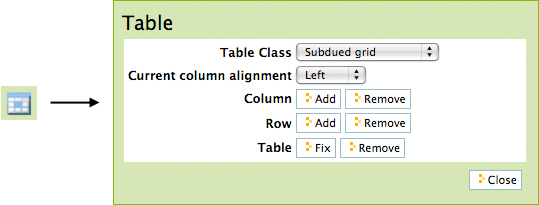
- A box titled Table will appear. Choose a table class (formatting style), and enter the number of rows and columns you'd like. If you intend for your first row to be a heading row, select the checkbox next to Create Headings. When you're done, click on Add Table.
- You'll be returned to your Body Text area, where you can now enter text into your table.
Note: When working with text in your table, we recommend not formatting it as a Paragraph using the formatting style drop-down menu in the toolbar. This will ensure consistent formatting between your table contents and the rest of your page.
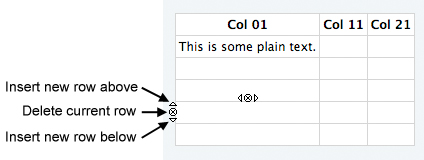
- To add a new row, click inside of a row directly above or below where you'd like to insert the new row. Small arrow icons should appear to the left of your current cell. (Note: This feature does not work in all browsers; therefore, we recommend using Firefox for working in the WebCMS.)
Click on the up arrow to insert a new row above the current one. Click on the down arrow to insert a new row below the current one. Click on the small x to delete the current row.
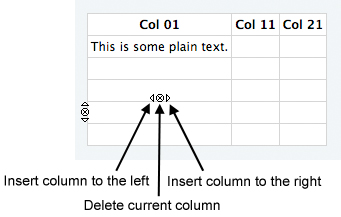
- To add a new column, click inside of a column directly to the left or to the right of where you'd like to insert the new column. Small arrow icons should appear above your current cell. (Note: This feature does not work in all browsers; therefore, we recommend using Firefox for working in the WebCMS.)
Click on the left arrow to insert a new column to the left. Click on the right arrow to insert a new column to the right. Click on the small x to delete the current column.
- To change the formatting style of the table, click anywhere inside the table and then click on the Insert Table icon in the formatting toolbar. A box titled Table will open. In the Table Class drop-down menu, choose which formatting style you'd like to apply to your table. Click here to view your formatting options.
When you're done, click on Close. - When you're done working with your table, you can continue to edit the rest of your page. When you're finished, remember to click Save.
I don't know which text editor I'm using.
Short Answer:
If your formatting toolbar is blue, you're using TinyMCE.
If your formatting toolbar is green, you're using Kupu.
Long Answer:
There are many differences between the Kupu and TinyMCE text editors. We strongly recommend using TinyMCE, especially for working with tables. If you would like to change your text editor from one to the other, click here to learn how.

